Monday, January 26, 2015
Wednesday, January 14, 2015
Standing sequins 2

In this sample I combined a few techniques that I have been playing around with. I explored standing sequins and got creative with the idea of stuffing.
I think this technique could be interesting for a big, structured skirt with a tight, sheer bodice or more practically for a light jacket. Texture is so much fun!
Wednesday, January 7, 2015
Standing sequins
Happy New Year!
I have been enjoying my break from school and catching up on plenty of rest and Youtube. One of my favorite channels is the Chanel channel. They have fantastic videos where they film the Chanel artisans making the couture collections among many others.
I was inspired one of the videos to experiment with standing sequins. The 3-d effect is beautiful and it almost looks like the sequins are growing towards you.You can find the video here: https://www.youtube.com/watch?v=M_WUvsFY9-4
This technique requires hand beading, so I took to my embroidery hoop to do a little abstract experimentation.
To do the standing sequin technique, I beaded several seed beads and went up through the sequin. I beaded another seed bead and then came back down through the sequin to anchor it. On the way back, I also went back with my needle through the first sequins that I had beaded and then down through the fabric in the same place. Pull the thread through and there you have it: standing sequins!
I have been enjoying my break from school and catching up on plenty of rest and Youtube. One of my favorite channels is the Chanel channel. They have fantastic videos where they film the Chanel artisans making the couture collections among many others.
I was inspired one of the videos to experiment with standing sequins. The 3-d effect is beautiful and it almost looks like the sequins are growing towards you.You can find the video here: https://www.youtube.com/watch?v=M_WUvsFY9-4
This technique requires hand beading, so I took to my embroidery hoop to do a little abstract experimentation.To do the standing sequin technique, I beaded several seed beads and went up through the sequin. I beaded another seed bead and then came back down through the sequin to anchor it. On the way back, I also went back with my needle through the first sequins that I had beaded and then down through the fabric in the same place. Pull the thread through and there you have it: standing sequins!
Friday, December 19, 2014
Origami elephant
This is my current beading project in progress. I took the outlines of a graphic origami elephant and turned it into beaded sections. I embroidered small parts of it.

Then, I cut out batting in a curvy shape and began to applique the elephant patch on top. Once it is finished, I will use photoshop to repeat the applique out to create a custom fabric that would be great for a fabulous beaded, super lightweight puffer jacket!

Just a little more to go! Then I'll figure out where it works in a garment. Pockets anyone?

Then, I cut out batting in a curvy shape and began to applique the elephant patch on top. Once it is finished, I will use photoshop to repeat the applique out to create a custom fabric that would be great for a fabulous beaded, super lightweight puffer jacket!
Just a little more to go! Then I'll figure out where it works in a garment. Pockets anyone?
Sunday, November 23, 2014
Progress!
Progress! I took my geometric sample off the frame so I could bring it in for a job opportunity and actually like it half-finished. I am debating whether to stitch it back on the frame and finish so I can turn it in as a class project or if I should do a new modified version...
Nadia
Friday, November 7, 2014
Geometric beaded design
Hi! Check out my work in progress.
I am working on a new beading sample which I am translating into my designs for my thesis collection. My thesis collection is very geometric. It is based on Islamic art and fragmented glass. This new beading sample that I am working on will be a cool optical accent in my collection.
My first step to creating the sample was to draw out my design on the stretched organza on my frame. Then I started at the outside and beaded out a nice clean frame with bugles.
The second step was to go in and begin the sequin circle in the center. Because the sequin circle is the motif with the most focus, it is important to fill in that area before beading the seed beads. After the sequin circle is complete the seed beads have a way of nestling in around the sequins nicely. I am excited to see how this turns out! I will be filling in the smaller geometric portions with tiny silver, white, and black seed beads. Stay tuned for updates!
I am working on a new beading sample which I am translating into my designs for my thesis collection. My thesis collection is very geometric. It is based on Islamic art and fragmented glass. This new beading sample that I am working on will be a cool optical accent in my collection.
My first step to creating the sample was to draw out my design on the stretched organza on my frame. Then I started at the outside and beaded out a nice clean frame with bugles.
The second step was to go in and begin the sequin circle in the center. Because the sequin circle is the motif with the most focus, it is important to fill in that area before beading the seed beads. After the sequin circle is complete the seed beads have a way of nestling in around the sequins nicely. I am excited to see how this turns out! I will be filling in the smaller geometric portions with tiny silver, white, and black seed beads. Stay tuned for updates!
Thursday, October 23, 2014
Scatter Beading Technique
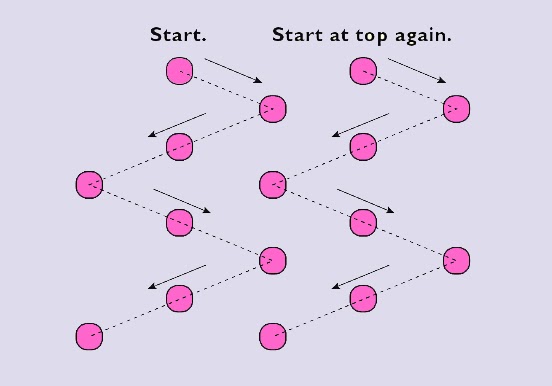
I came across a great diagram to help with scatter beading that I though would be helpful to share. The diagram is from the book "All-In-One Beading Buddy" and helps break down the look of scattered beads in a very logical pattern.
I stitched my zigzag pattern with white thread and then pulled out the embroidery floss. It will take a little more practice to get the zigzags straighter and more even but overall I am happy with the look of it.
-Nadia
As a perfectionist I have struggled to achieve the perfect spacing in my scattered beading so I decided to give this great method a try.
First, I framed out my area with bugle beads. Then, to ensure that the zigzag stitching pattern would remain proportional on both sides I stitched through the middle with peach colored embroidery floss (not knotting it at the ends).
I stitched my zigzag pattern with white thread and then pulled out the embroidery floss. It will take a little more practice to get the zigzags straighter and more even but overall I am happy with the look of it.
Subscribe to:
Posts (Atom)